The town is where players of a fantasy RPG spend the most time, and it is where weak art shows first. Draw every house by hand and each new building becomes another drawing job. Use a handful of ready-made house sprites and every town looks the same, and none of them fits the street you planned. The way out is a kit: roofs and walls in pieces that stack into a house of any width, with props, people and a night version that all share one grid. This guide walks through a top-down medieval town in that order: the street plan, the houses, the shops, the props, the townsfolk, the night and the weather.
Start with the street plan, not the houses
Decide where the player walks before you place a single roof. Where do they enter? Where is the square? Which buildings must they find on the first visit? A town reads well when the important places sit on the main road and the homes fill the side streets. Sketch it on paper or block it out with plain tiles first, then paint the roads.
- An entrance the player can see from the road in.
- A square with a well or a fountain where the main roads meet.
- The inn, the smithy and the shops facing the square.
- Homes on the side streets, with gardens or fences between them.
- An edge to the town: a stone wall, a palisade or open fields.
- One landmark that can be seen from far away, such as a windmill or a watchtower.
Roads are faster to paint as an autotile than piece by piece. Medieval Village has a 47-tile cobblestone road that lies on grass or snow, market-square flagstones, and a dry-stone wall and a wooden palisade with 16 joins each and a gate. The neighbour bitmask is in every cobblestone file name and in village.json, so the road can be wired to your engine's autotiling once. If you want how the 47 pieces work, read how to make a 47-tile blob autotile set; for a terrain the pack lacks, the Autotile Builder turns a small template into a full set.
Houses of any size from roof and wall pieces
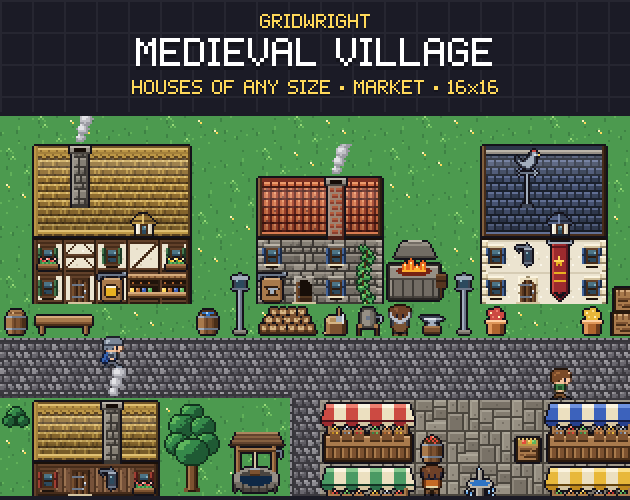
A house in a top-down town is a stack: a row of wall at the bottom, then the roof's eave, its slopes and its ridge. When each row comes as a left, a middle and a right piece, a house gets wider by adding middle pieces, and a tall townhouse is just more rows. Medieval Village builds its houses that way, with 184 tiles for the job. The roofs come in 4 styles (thatch, clay tile, slate and wood shingle) as ridge, slope and eave rows with left, middle and right pieces, and every roof also comes snow-covered. The facades come in 4 materials (timber frame, fieldstone, wooden planks and whitewash) with walls, windows, doors, open doors and shop counters. The roofs run left to right, so the houses are side-gabled.
Mixing materials is how one kit gives a whole town. Slate roofs on fieldstone walls can mark the rich street, thatch on timber frame the edge of town, and clay tile on whitewash a southern quarter. The pack also has 18 ready-made buildings (a cottage, an inn, a smithy, a shop, a townhouse and a hall, each by day, lit for night and in winter) with their recipes in the JSON. Read one recipe before you build your own: it shows which piece goes on which row.
Shops that read without words
A player should spot the smithy without reading a sign. Hanging signs with pictures do that in every language and never need translating. Medieval Village has 10 of them with icons and no words: inn, smith, alchemist, baker, armourer, weapons, herbalist, scribe, general store and tailor. Its other facade overlays (flower boxes, wall lanterns, two-storey banners and ivy) are how two houses built from the same pieces stop looking like twins. Chimneys come plain and snowy with animated smoke, and there is a weathervane for the hall.
Props that make a street feel lived in
Empty streets look like a level editor. Props tell the player what happens in each place, so put them where people would work: barrels and crates by the inn, the anvil and the forge by the smithy, stalls around the square, a laundry line behind a house. Medieval Village has 57 props: market stalls in 4 colours, a well, a fountain, a notice board, a signpost, lamp posts by day and night, braziers, barrels, crates, sacks, handcarts, a smithy set (anvil, forge, grindstone, weapon rack, armour stand), a woodpile, benches, a table, flower pots, a wayside shrine, trees and bushes, a windmill with turning sails and a watchtower. The windmill, the chimney smoke, the fountain, the forge, the braziers and the flags are animated, and a few moving things are enough to make a still town feel awake. Keep the walking lanes clear: a prop in the way of the main road is a prop the player will bump into on every visit.
Townsfolk on the same grid
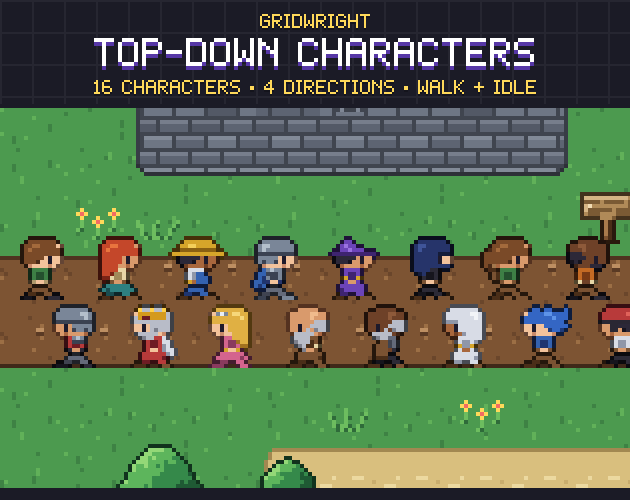
People make the town, and they have to match its scale. Top-Down Characters has 16 characters on the same 16x16 grid: a villager, a townswoman, a farmer, a knight, a mage, a rogue, an archer, a merchant, a guard, a king, a princess, an elder, a blacksmith, a priest, an adventurer and a pirate. Each faces down, left, right and up with a 2-frame idle and a 4-frame walk, with the feet on the bottom rows. Cast them by place: the blacksmith by the forge, the merchant at a stall, the guard at the gate, the priest at the shrine, the elder in the square. The 12 emote bubbles (heart, exclamation, question, music, sleep and more) show what a person thinks before the player talks to them.
Because the feet sit on the bottom rows of every frame and the props stand on their bottom row too, you can sort the drawing order by the bottom edge, and a villager walking behind a market stall is hidden by it as expected.
Night: lit windows first, lights second
A town at night is mostly about windows. Start in the art: Medieval Village has lit night versions of its windows and shop counters, and its lamp posts and wall lanterns come by day and by night. Swapping those pieces at dusk already says evening. Then darken the scene and add light where the lamps are. In Godot 4, a CanvasModulate node sets the base colour of the whole canvas: Godot's 2D lights page describes it as the ambient colour that darkens the scene, and without it lights only brighten a scene that is already fully lit. A PointLight2D needs a texture, whose size sets the light's size, and its default blend mode, Add, suits most cases. Read our guide to 2D lighting for pixel art in Godot 4 for the light textures.
- Swap the windows, counters, lamp posts and lanterns to their lit versions.
- Add one CanvasModulate with a dark blue colour to the town's scene.
- Put a small PointLight2D on each lamp, lantern and brazier. Godot notes that larger lights cost more.
- Keep the interface on its own CanvasLayer, so the night tint doesn't darken the menus.
Weather and the seasons
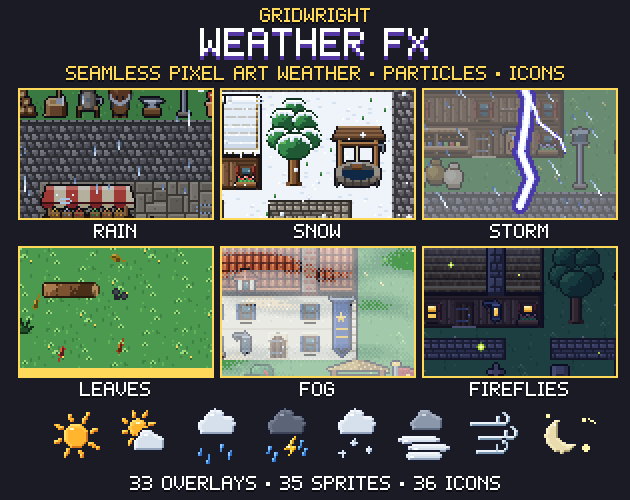
The same town can carry the whole year. Every roof in Medieval Village also comes snow-covered, the 18 buildings come in winter, and the chimneys and trees have snowy versions, with the cobblestone road lying on snow. For falling weather, Weather FX has 33 overlays as 128x128 tiles that repeat across the screen and loop without a seam: rain, storms, snow, blizzards, fog, falling leaves, fireflies and more. It adds 8 screen tints (night, dusk, dawn, storm, overcast, cold, heat and underwater) and 18 presets such as foggy morning and summer night that say which layers to stack. Fireflies over a lit town are a cheap summer night. Our post on seamless weather in 2D games covers how to layer the loops.
What this kit leaves out
Medieval Village has no characters, no interiors, no water or bridges and no engine project files, and its roofs only run left to right. The characters come from Top-Down Characters, and the weather has no sound or shaders: it is sprites and tiles you play in your engine. Plan the town around that, or fill the gaps from packs on the same 16x16 grid.
Gridwright packs can be used in commercial games; you may not resell the files themselves. Packs released from October 28, 2026 ask for a credit: “Art by Gridwright” with a link (each pack’s LICENSE.txt says which applies). More on that in can I use game assets in a commercial game.